Well this has been under way for a bit now, I just thought I would put a taste on here and then update it as deems nessesary. What it started as is a $700 1986 suzuki samurai, I got it with a spoa lift and ultra oversized shocks a misfit lift and 32s. It sat in the drive way rusting, then out to Crashfab it went. here are a few pictures of it before the start. I will put some updates soon as to the progress.
-
Help Support Hardline Crawlers :
You are using an out of date browser. It may not display this or other websites correctly.
You should upgrade or use an alternative browser.
You should upgrade or use an alternative browser.
Project "Secret Squirrel"
- Thread starter Jeepless
- Start date
Jeepless said:Well this has been under way for a bit now, I just thought I would put a taste on here and then update it as deems nessesary. What it started as is a $700 1986 suzuki samurai, I got it with a spoa lift and ultra oversized shocks a misfit lift and 32s. It sat in the drive way rusting, then out to Crashfab it went. here are a few pictures of it before the start. I will put some updates soon as to the progress.
Thats all the pics you have??????:rb:
olllllllo
Well-Known Member
3 squirrel power! :haha:
Last edited:
OH no no no....I have lots but I will just need a bit of time to sit down at home and do a little write up for it. be patientBrian H said:Thats all the pics you have??????:rb:
Jeepless said:OH no no no....I have lots but I will just need a bit of time to sit down at home and do a little write up for it. be patient
Now busta!!!!!! I want pics now!!! Im impatient man.:clappy: :haha:
Ok since you are all so hell bent on the Squirrel pictures I will ablige with a short write up on her.
First, I know you all laugh as I never wheeled this thing, unless you count the time I put the front wheel on the 8 inches of landscaping block out front of the house here.
With out a garage and most of the needed tools to do a build up in a quick, or safe fashion I engaged Crashfab to do the work. I told the man my budget and we discussed how I would like it done, and then I quickly handed him the creative freedom any capable fabricator would want. ALL! and he does indeed keep me on budget, "jack lets keep in mind that some of these things can be upgraded later" its ringing in my ears...:;

Here she is out at mikes the day he pulls it into the garage.


What I found is very amazing about the SUzuki Samurai is that it comes a part nicly and there are people out there that will give you money for the parts.....quickly I recovered the vehicle cost with a few sales. Here is the beginging of the end. I was amazed at the simple cleanlyness of it all.....don't ever expect this thing to look like this again.


And would you expect anythingless than one more go at the ramp. :hi: :kiss:

Ok as many of you already know a 1.3l motor is not the best "PowerPlant" if you know what I mean. So I found this little guy.

This is a 2RZ out of a 2001 tacoma...I think. never the less 2.4l is better than the previos wood chuck that was spining under there. NOW WE HAVE THE "Secret Squirrel"

Well, the next step is a given, more power means more beef

and some sweet ass mounts to hold the "Secret Squirrels" under the hood.


Well a known issue with this motor is the oil pan......hangs down a counrty mile, so mike put me to the task of getting the parts list for the rear sump and pan....I LOVE GOOGLE!
Parts list:
12101-75060 Oil Pan, (T100 2wd 2.7L, 6 qts)
15104-75020 Pickup Tube & Strainer, (T100 2wd 2.7L)
11494-75010 Oil Hole Plate, (T100 2wd 2.7L)
15147-75020 Oil Strainer Gasket, (T100 2wd 2.7L)
15301-75020 Oil Gage (Dipstick), (T100 2wd 2.7L)
11409-75020 Oil Gage Guide (Dipstick), (T100 2wd 2.7L)
91651-60614 Bolts (Oil Hole plate), (4) Req'd
00295-00103 FIPG (Form in Place Gasket material)
NOt in place but I have them now.
Well since I am running a Toy motor...I figured what the hell I like lots of levers and switches. OH and no these things were not this clean to start with......... and I had very little to do with it.


And I will update the goings on as I know.
Or if Crash has some input DO IT MAN!
First, I know you all laugh as I never wheeled this thing, unless you count the time I put the front wheel on the 8 inches of landscaping block out front of the house here.
With out a garage and most of the needed tools to do a build up in a quick, or safe fashion I engaged Crashfab to do the work. I told the man my budget and we discussed how I would like it done, and then I quickly handed him the creative freedom any capable fabricator would want. ALL! and he does indeed keep me on budget, "jack lets keep in mind that some of these things can be upgraded later" its ringing in my ears...:;
Here she is out at mikes the day he pulls it into the garage.


What I found is very amazing about the SUzuki Samurai is that it comes a part nicly and there are people out there that will give you money for the parts.....quickly I recovered the vehicle cost with a few sales. Here is the beginging of the end. I was amazed at the simple cleanlyness of it all.....don't ever expect this thing to look like this again.


And would you expect anythingless than one more go at the ramp.

Ok as many of you already know a 1.3l motor is not the best "PowerPlant" if you know what I mean. So I found this little guy.

This is a 2RZ out of a 2001 tacoma...I think. never the less 2.4l is better than the previos wood chuck that was spining under there. NOW WE HAVE THE "Secret Squirrel"

Well, the next step is a given, more power means more beef

and some sweet ass mounts to hold the "Secret Squirrels" under the hood.


Well a known issue with this motor is the oil pan......hangs down a counrty mile, so mike put me to the task of getting the parts list for the rear sump and pan....I LOVE GOOGLE!
Parts list:
12101-75060 Oil Pan, (T100 2wd 2.7L, 6 qts)
15104-75020 Pickup Tube & Strainer, (T100 2wd 2.7L)
11494-75010 Oil Hole Plate, (T100 2wd 2.7L)
15147-75020 Oil Strainer Gasket, (T100 2wd 2.7L)
15301-75020 Oil Gage (Dipstick), (T100 2wd 2.7L)
11409-75020 Oil Gage Guide (Dipstick), (T100 2wd 2.7L)
91651-60614 Bolts (Oil Hole plate), (4) Req'd
00295-00103 FIPG (Form in Place Gasket material)
NOt in place but I have them now.
Well since I am running a Toy motor...I figured what the hell I like lots of levers and switches. OH and no these things were not this clean to start with.........


And I will update the goings on as I know.
Or if Crash has some input DO IT MAN!
Attachments
GRNTACO
This Space Blank
Good name..........GREAT looking build.:corn:
Nuzzy
Well-Known Member
Very 
I can't wait to see what crazy ideas y'all have for that thing
I can't wait to see what crazy ideas y'all have for that thing
crash2
-Oh no I picked a side-
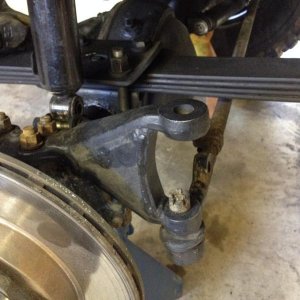
Here is the front diff with all the crap cut off and sorta prepped.

And I finally ripped the front axle and all other items out from under the rig.

The front will be using YJ springs and I am moving the axle forward 3". So I will be extending the frame a hare at the front and incorpurating winch mount/tube placements into the whole thing and hopefully end up with a smooth transition from the very front to the sheet metal.

And I finally ripped the front axle and all other items out from under the rig.

The front will be using YJ springs and I am moving the axle forward 3". So I will be extending the frame a hare at the front and incorpurating winch mount/tube placements into the whole thing and hopefully end up with a smooth transition from the very front to the sheet metal.
crash2
-Oh no I picked a side-
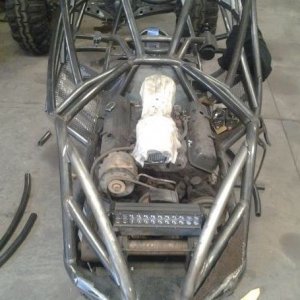
Since I am waiting on more parts to get the front some what figured out. I figured I would start to try and get the trans and t-cases in the rig. Plus this will help with getting closer to the proper weight of the rig for setting up the front suspension.
So to get these larger parts to fit some sheet metal lovin will be in order. One thing I have to figure out is where the rig will get lopped off at in the rear to stretch it/tube it out. So for now I will be removing sheet metal to get things fitted but at the same time trying to look 3 steps ahead.
Here is the bell housing. Its literraly almost against the tunnel/lip of the firewall

And time to prep for a lil plasma fun :cheer: :cheer: :cheer:

And here I just slit the tunnel with the intention of being able to fold the sheet metal back and weld it back up--stretching the tunnel..

So to get these larger parts to fit some sheet metal lovin will be in order. One thing I have to figure out is where the rig will get lopped off at in the rear to stretch it/tube it out. So for now I will be removing sheet metal to get things fitted but at the same time trying to look 3 steps ahead.
Here is the bell housing. Its literraly almost against the tunnel/lip of the firewall

And time to prep for a lil plasma fun :cheer: :cheer: :cheer:

And here I just slit the tunnel with the intention of being able to fold the sheet metal back and weld it back up--stretching the tunnel..

2pwrlftrs4u
NWW Meanie
looks like a fun build... did you get rights to the name from shane 
My squirrel isn't a secret...:haha:2pwrlftrs4u said:looks like a fun build... did you get rights to the name from shane
Nuzzy
Well-Known Member
I was thinking of ordering plastic bags too! :redneck:
Nice
Nice
TacOffRd
Well-Known Member
Sweet build. How much are you having to extend the wheelbase for the (I'm assuming) longer drivetrain?
crash2
-Oh no I picked a side-
Ok so here is how the passenger side looked once I did a lil more trimming and some tach tach work. It worked out perfect and once welded up it should look perfect :;

I ended up having to do a portion of the drivers side.


I ended up having to do a portion of the drivers side.

crash2
-Oh no I picked a side-
Ya--its a snug fit in the tunnel 


Here you can see the doubler finally bolted up :clappy:


Here you can see the doubler finally bolted up :clappy:


