P
PUO-BANNED
Guest
This is a cheap and easy way to firm up the shifts in your TH400 and eliminate the 1-2 shift override
Items needed to perform this modification
Beer.
Cordless Drill and a Assortment of Drill Bits.
3/8 drive ratchet, 6" extension and 3/8-7/16-1/2 inch sockets.
5/16-18 set screw.
5/16-18 tap and driver.
Brake Clean or Starting Fluid.
Compressed Air.
Clean Lint free shop rags.
Clean Work Area!
2 gallons ATF.
Filter/gasket kit.
Valvebody and spacer plate gasket.
Welding clamp or C-clamp.
Flat nosed punch and ball peen hammer.
Standard Screwdriver
Bench Grinder.
Drain Pan
Piggy Back Drain Plug or one of those spendy Trans drain plug kits
If you havent already installed a drain plug in the pan now is the time to do it.
most parts stores sell a "drain plug kit" these are anywhere from $10-$20 but if you have a welder buy a piggy back plug for @ $2.00

Now take your trusty cordless drill and a 3/8 bit and drill a hole in the pan where the "dimple" is. Let the fluid drain and remove the Pan. Drill the appropriate sized hole and weld the plug in.
Next you remove the filter and valvebody. Be Careful because the front servo piston/spring will fall out when you remove the VB.
Leave the detent solenoid (kickdown switch) on because this holds the spacer plate and check balls. If you remove the detent solenoid the spacer plate will come off with the valvebody and check balls will fall out. Not fun.

The detent solenoid is removed here. (marked by red X)
Take note of the manual valve and detent spring location (yellow X)
And The Governer Feed/Return Pipes (green X)

With the valvebody off and on a clean work area remove the 1-2 shift valve by pushing the roll pin out with a screwdriver. Lay it on the bench in a orderly fashion. grind 2 flats in the area marked with the red arrow and drill out the exhaust hole to just under .250 (red arrow)
clean with brake clean and compressed air.
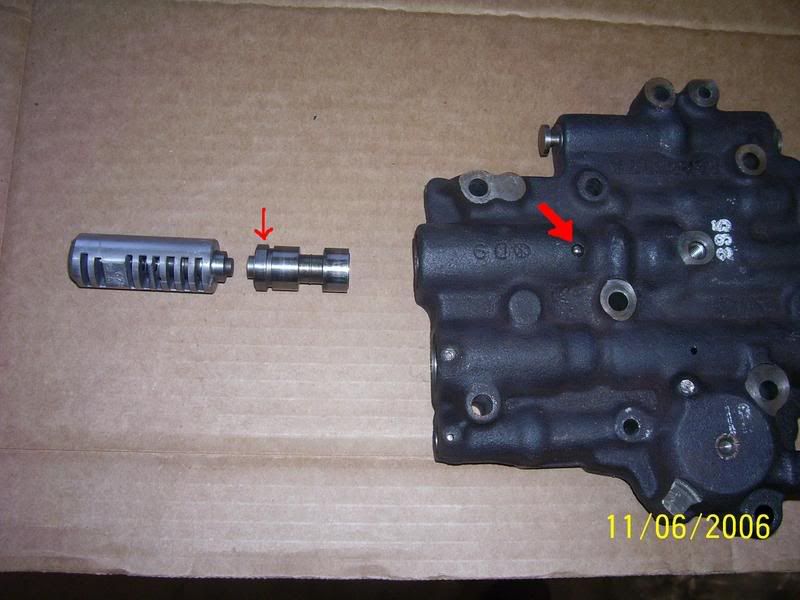
1-2 shift valve with flats ground.

Next remove the 2-3 accumulator piston/spring.


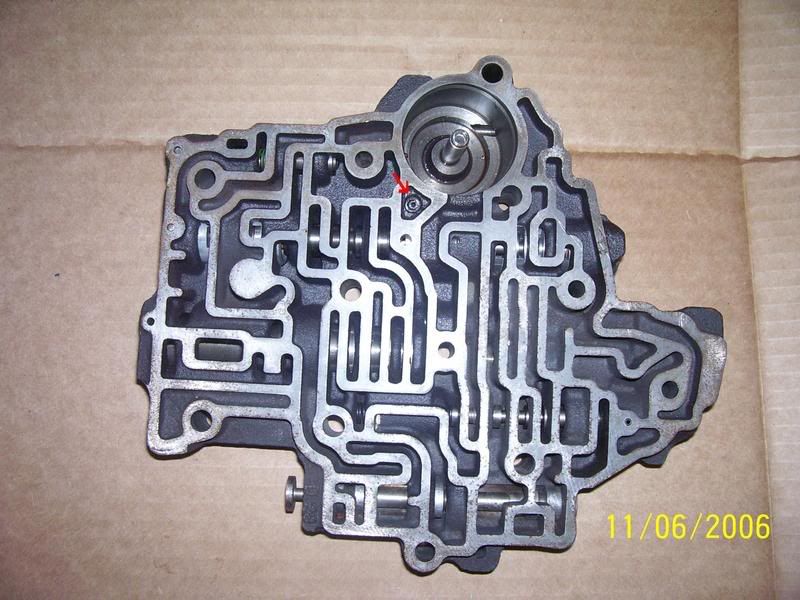
I pushed down on the piston then used a Welding clamp to hold it while I removed the e-clip. discard the spring and tap the feed hole to 5/16. Clean with brake clean and compressed air. then install the set screw (red arrow)
Now Remove the detent solenoid and the spacer plate. be careful not to lose the check balls.
Take a 1/8 drill bit, your trusty cordless and drill the plate
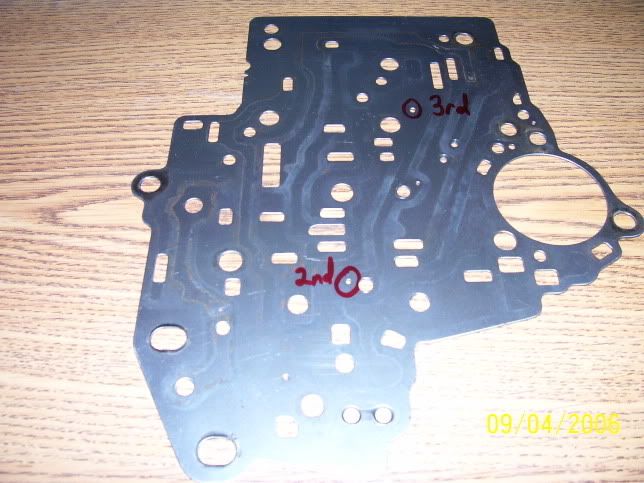
There should be 7 check balls. you only need five. Install one of the check balls in the 1-2 exhaust hole you drilled earlier. I found a bit that was just under .250 to drill the hole then used a hammer and flat nosed punch to install the check ball.

Clean the valvebody with brake clean or equivalent and blow dry with compressed air. Using fresh ATF Install the 1-2 shift valve and the 2-3 accumulator piston. Some TH400 came with a plastic accumulator piston that is prone to failure. If you have one of these I highly recommend purchasing a aluminum piston and new seal.

check the piston seal before you install it! If its bad replace it.
With the valve body re-assembled it's time to button things up.
I used Grease to keep the check balls in place. you use 5
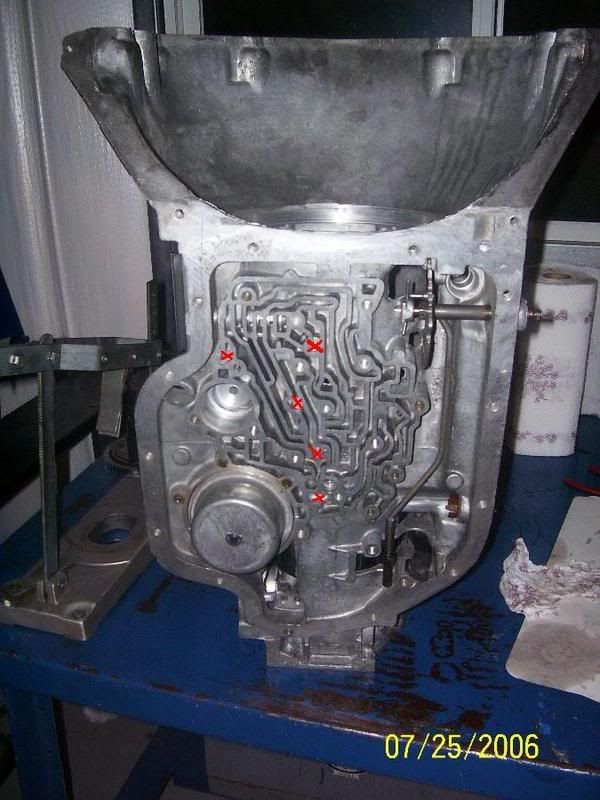

The tricky part about re-assembly is the front servo piston. Hold the valve body with one hand while getting the governer feed tubes started. This will hold the valve body while you push the front servo piston into place. Don't force the valve body and don't tighten down any bolts untill everything is in place. I torqed the bolts, Installed the detent solenoid, filter/spacer and Pan. Added 6 quarts of fresh ATF and road tested.
the 1-2 shift is positive and not too harsh and there is no longer a lag between 2-3. The full throttle 1-2 upshift dont **** around :mrgreen:
Here is a link to a full TH400 rebuild and Exploded parts diagram. This was VERY helpful.
http://forums.minnesotamud.com/showthread.php?t=4210
Items needed to perform this modification
Beer.
Cordless Drill and a Assortment of Drill Bits.
3/8 drive ratchet, 6" extension and 3/8-7/16-1/2 inch sockets.
5/16-18 set screw.
5/16-18 tap and driver.
Brake Clean or Starting Fluid.
Compressed Air.
Clean Lint free shop rags.
Clean Work Area!
2 gallons ATF.
Filter/gasket kit.
Valvebody and spacer plate gasket.
Welding clamp or C-clamp.
Flat nosed punch and ball peen hammer.
Standard Screwdriver
Bench Grinder.
Drain Pan
Piggy Back Drain Plug or one of those spendy Trans drain plug kits
If you havent already installed a drain plug in the pan now is the time to do it.
most parts stores sell a "drain plug kit" these are anywhere from $10-$20 but if you have a welder buy a piggy back plug for @ $2.00

Now take your trusty cordless drill and a 3/8 bit and drill a hole in the pan where the "dimple" is. Let the fluid drain and remove the Pan. Drill the appropriate sized hole and weld the plug in.
Next you remove the filter and valvebody. Be Careful because the front servo piston/spring will fall out when you remove the VB.
Leave the detent solenoid (kickdown switch) on because this holds the spacer plate and check balls. If you remove the detent solenoid the spacer plate will come off with the valvebody and check balls will fall out. Not fun.

The detent solenoid is removed here. (marked by red X)
Take note of the manual valve and detent spring location (yellow X)
And The Governer Feed/Return Pipes (green X)

With the valvebody off and on a clean work area remove the 1-2 shift valve by pushing the roll pin out with a screwdriver. Lay it on the bench in a orderly fashion. grind 2 flats in the area marked with the red arrow and drill out the exhaust hole to just under .250 (red arrow)
clean with brake clean and compressed air.

1-2 shift valve with flats ground.

Next remove the 2-3 accumulator piston/spring.


I pushed down on the piston then used a Welding clamp to hold it while I removed the e-clip. discard the spring and tap the feed hole to 5/16. Clean with brake clean and compressed air. then install the set screw (red arrow)

Now Remove the detent solenoid and the spacer plate. be careful not to lose the check balls.
Take a 1/8 drill bit, your trusty cordless and drill the plate

There should be 7 check balls. you only need five. Install one of the check balls in the 1-2 exhaust hole you drilled earlier. I found a bit that was just under .250 to drill the hole then used a hammer and flat nosed punch to install the check ball.

Clean the valvebody with brake clean or equivalent and blow dry with compressed air. Using fresh ATF Install the 1-2 shift valve and the 2-3 accumulator piston. Some TH400 came with a plastic accumulator piston that is prone to failure. If you have one of these I highly recommend purchasing a aluminum piston and new seal.

check the piston seal before you install it! If its bad replace it.
With the valve body re-assembled it's time to button things up.
I used Grease to keep the check balls in place. you use 5


The tricky part about re-assembly is the front servo piston. Hold the valve body with one hand while getting the governer feed tubes started. This will hold the valve body while you push the front servo piston into place. Don't force the valve body and don't tighten down any bolts untill everything is in place. I torqed the bolts, Installed the detent solenoid, filter/spacer and Pan. Added 6 quarts of fresh ATF and road tested.
the 1-2 shift is positive and not too harsh and there is no longer a lag between 2-3. The full throttle 1-2 upshift dont **** around :mrgreen:
Here is a link to a full TH400 rebuild and Exploded parts diagram. This was VERY helpful.
http://forums.minnesotamud.com/showthread.php?t=4210

