• Help Support Hardline Crawlers :

FiFo's Short Bus Build

Now the real fun begins
January 2007 034


My turn
January 2007 035


What ever this seam is called, it’s coming off and will be replaced with 2†DOM tube on the bottom and 1.5†DOM on the top.
January 2007 042


And so ends Saturday night
January 2007 048


Sunday we started by finished the cutting on the passenger side and finalizing where the first major piece of tube was going to go. Then after Tom patiently taught a quick class of tube bending 101 we got started on bending the tube.
January 28 2007 006


Finished bending the first tube, as you can see it spans the entire length of the vehicle and will tie in with the front and rear bumpers.
January 28 2007 009


We finished the matching passenger side tube and roughed out a plan for the rear bumper. Since I had a Midterm the next day we cut out early so I could get some studying done.
January 28 2007 012
 
Weekend Two

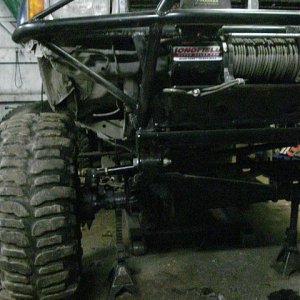
Went to Tom's (tomsbrokeagain) shop on Sunday to get some more work done on the XJ, I was pleasantly surprised to see Tom had a little extra time this week and started the rear bumper in between his other projects. This is the top piece of the rear bumper, it wraps around the sides before coming up to meet the section of cage we built last week. 1.5" tube is going to be used to form a second piece that will protect the stock body and allow us to tie into the stock bumper mounts. Where designing it so that if the 2 shackles that are going to be mounted to it get pulled on most of the force will be distributed to the new cage structure.

Feb 4 2007 002


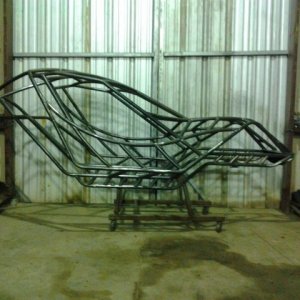
After some basic planning we got to work cutting more stuff off the XJ. A small notch had to be made so that the tube bent last weekend could run closer to the body and with in the original front fenders. We then got to work building the driver side hoop that will run from the windshield all the way back to the rear quarter. Instead of bending it strait down like most cage designs, I had the brilliant, and I use that term loosely, idea of continuing it strait so that it would meet with the front flare, then run a separate piece of 2" down to form a triangle. The idea is that with out the extra bend the cage will be stronger.

For the record, the engineers who designed the XJ apparently had the mentality of "When in dought, add another layer of metal, if all you need are welds, add bolt too, and every now and then, add glue, just for good measure". We found no less then 3 layers of metal between the outer fender and the inner wall of the Cherokee. Most of this metal was welded on, but we encountered 2 bolts that appeared to hold nothing up, but where designed with laser like accuracy to get in our way. We even found two sheets that where further glued together for good measure!

Anyways here is the partially finished cutting job.

Feb 4 2007 010


Once metal was cut away the real planning got under way. Tom and I threw around possible heights for a good while all with in 3 inches of each other. 3 inches doesn't seem like that big a deal, But Tom is something of a perfectionist when it comes to his work so wanted to get it just right, and as it is we hit the stock XJ height to with in ½ an inch, which after cooping and bending struck me as fairly impressive.

So after all the measuring was finished we finally got around to making the first bend. This was better then any excitement any "bowl" game being played at the time could have provided since I finally was starting to see how my design was taking shape.

I drew in the vertical support that is going to be added later.

Feb 4 2007 013


Next up was the rear, the tube goes to the end of what is going to be the new roof, and then angles down in the back to end at the rear quarter, where that new rear bumper I mentioned earlier now resides. Part of the way down the lower tube that was fabbed last week had to be cut off and cooped so that it ended into this new tube. Over all I think it came out fairly well.

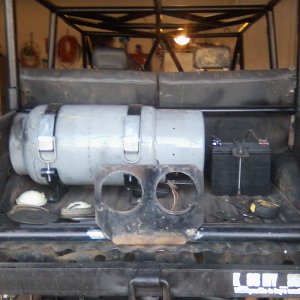
The rear here is going to be boxed in more and a Comanche (MJ) tailgate that was procured from "junkyard jim" (Thanks man!) will be installed. Where still not sure if we will be able to make the tailgate open and close, or if we will just weld it in, but as long as it has the "J E E P" logo my wife will be happy, which will keep me alive when she sees how much money I'm spending.

Feb 4 2007 021


Finally some of the sharper eyes might have noticed in the above picture there is a 10% bend inward at the height of the stock firewall. This was one of Tom's improvements to my original design, which I think is going to greatly improve it. You can see here how it compares to the stock window pillar on the Passenger side.

Feb 4 2007 019


We got started on the other side but I had to go since I had yet another Mid-term to study for. However I couldn't help but play with some pics in MS Paint to get an idea what it would look like once more tube is up in place.

Feb 4 2007 020


Kind of Cool if you ask me!
 
Last edited:
Bunk said:
Are you going to try to reskin it with the orig body panels?

That was the original idea, but I think we've pretty much scraped it at this point. The front finders are probably going back on after a little trimming, but the top and some of the side pieces are probably going to be reskined with something like 20 gauge sheet metal. At this point I am actually quite a bit narrower then stock, might even come out slightly narrower then a TJ, between that and the fact that we have eliminated most of the original structural support it would just be easier to weld in new body panels at this point.

We are planning on a new windshield though, Tom (tomsbrokeagain) has some supper trick design he’s planning on, but I will leave it at that for know incase it doesn’t work out.

Oh, and we noticed it looked a lot like a commando ourselves, it was completely unintentional but there it is. You know what they say; imitation is the sincerest form of flattery.
 
I like. I like. Keep the pics coming.

I think you should have plated and raised the rockers while you were at it.
 
Cascade_Crawler said:
you planning to trailer this thing?

I'm planning on making it "streat legal" but I'm also working on getting a trailer. I want to trailer it when possible but still follow the letter of the law as far as legality. IE. it will have all the lights, flares, and mudflaps I need to have to be street legal, though I don't intend on driving it on the street all that often.
 
Not much to report this morning, with winter convention going on last weekend we weren’t able to get back to the XJ Project until yesterday. Tom (Tomsbrokeagain) crafted a matching passenger side upper hoop which we spend the morning making some minor adjustments too so that it would better match the driver side.

Feb 17 001


With that finished I got to work learning the fine art of cooping. We wanted three horizontal pieces for the roof each 48†wide so that we can later weld on a piece of sheet metal which conveniently is also 48†wide, amazing coincidence hu? Here I have placed the first piece in place to admire my handy work.

Feb 17 002


Unfortunately while the rear is almost the perfect width we came out a little wider in the front. Where going to have to take a little bit of the bend out of the passenger side upper hoop, to fix this problem, but for now ratchet straps work just fine.

Feb 17 004


My final piece for the night was to finish the front vertical support. Instead of bending the windshield pillar down to meet the floor, we ran it strait to the wheel well and then added this piece of 2†to connect it to the floor, forming this little triangle. I think this way will be a lot stronger. It’s almost a shame that we plan on coving it with the original front fenders, I think it looks cool. :cool:

Oh, and before anyone says it, I need to touch up the cooping job on the top. Hey it was my first non-90 degree coop.

Feb 17 007


Tom spent most of the day coming up with a plan for installing an 8274-50 on an XJ. He got started on that but I didn’t get any pictures. Hopefully I will have some this afternoon since I know he got a piece of 2†all cut and ready for bending before we had to quit in order to take our respective significant others out to belated valentine day diners.
 
For the record it should be measure twice, cut once, and make sure you cut on the right line! I got to work on the “C†pillar on Sunday. I had the lower coop and the 10 degree bend in when I measured for the final coop. Took it over to the band saw to cut away the excess so that cooping would be a little easier and instead of cutting 1 inch form the coop line I cut at the coop line. :mad: Of course that didn’t occur to me, I measured 1 inch from my cut and proceeded to coop it. Naturally when I went to fit it up I was exactly 1 inch short. Anyways here is a picture of the piece after try number two.

Build-up 002


While I was attempting to see how many times I could make the same piece, Tom was working on the front bumper. I think he bent this one degree at a time, or at least it seamed like it. It was one of those cases where you bend it a little, see how it comes out, and then bend it a little more, rinse and repeat until everything lines up properly. The process wasn’t really speedup any by the fact that he had to simultaneously see how complicated of a bend he could do. I know the outer bend started at 45 degrees with a 51 degree rotation to make it go up and back on the same bend. What it ended up as is anyone’s guess as it was “adjusted†several times.

Build-up 003


And from the side.
Build-up 005


Now we come to the money shot, my double coop! The design of the roof calls for all the pieces to come meet at the center of the roof. I’m sure you have all seen the basic design before, I’m shamelessly stealing the idea fro GaryTJ since that is where I saw it first. Well first time out and I hit it dead center! :cool:

Build-up 010


Now tell me that isn’t a beautiful sight. Only one slight, minor problem, how in the world do measure for the other side! Well, how ever the proper way is, I didn’t do it. This beautiful piece of fine craftsmanship ended up being salvaged for the rear 90 degree bar because I made it to short when I cut the other end. At least I can tell myself that I didn’t waist that much material, but the above picture sure was beautiful while it lasted. Anyways here it is after I fixed my second mistake of the weekend. The lower most tube is what became of the former diagonal. There is eventually going to be a tube piece from each corner into the center, just as soon as I figure out how to do it.

Build-up 011
 
lookin good!

I hate to be the one to point this out but that cherokee body is a good template:redneck:
 
nice work on the lower bumper piece, i know how those can turn out not exactly as planned but the finished project is great.

bet your glad you dont have to make another one match it ehh:D
 
Hip said:
nice work on the lower bumper piece, i know how those can turn out not exactly as planned but the finished project is great.

bet your glad you dont have to make another one match it ehh:D

tomsbrokeagain gets the credit for that, he spent most of the weekend finessing that bumper into place while I worked on coping (and recoping) various pieces. Originally it was way to wide, but it's a lot easier to bend it a little more then to unbend it, so he took his time and did it right. Where setting it exactly 8.5" in front of the top of the front cross member you see in the pic, so that it will stick out as little as possible and still be able to mount an 8274. Only problem is that means the front grill isn't going to fit, but well figure something out for that when we get to it.
 
FiFo said:
Only problem is that means the front grill isn't going to fit, but well figure something out for that when we get to it.

notchin the front grill will still look good. :cool: good progress so far.
 
Bunk said:
Coop=chickens. Cope=tube work...Looking good so far man.

If you see the quality for my "cope" you might think "coop" is the more accurate description. Though I will try to remember that Monday when I post my next update. Good thing UW doesn't have a spelling entrance requirement!
 
I got together with Tom (tomsbrokeagain) on Sunday to get some more work done on the XJ. We played around with the placement for the lower window support, finally deciding that we didn’t like how high it was going to be if we set it on top of the dash, so naturally there was only one thing to do, cut it up! Out came our favorite tool, the saw zaw. Naturally after we started cutting we discovered that the entire inside of the dash is one big air duct in the XJ, and since I still wanted my dash heat vents to work where going to have to make sure there aren’t any leaks. Luckily this is nothing a little care taken with where you cut and a little RTV won’t cure.

Here Tom goes to town with the Saw Zaw, and you though there wasn’t anything left for us to cut! In the background you can see KarlVPs TJ, he was fixing some lights he broke Saturday on the Busy-wild at Elbe

Build-up 002


Here it is with a piece of tube in place for mockup purposes. Visibility of the front end of the vehicle is much better with it hunkered down like this.

Build-up 010


And finally from the driver’s seat, pretty sweat!

Build-up 008


We have a windshield planned out for later, but that’s as far as Tom got because I had taken over the coping machine and I wasn’t giving it back until I finally concurred the roof! After a few tries I decided that going form corner to corner was just too difficult, and that I would just run from the outside corner to next to the center, making it three easy copes instead of 4 hard ones. Of course after doing the rear I figured out the secret to doing corner-to-corner, do three copes and then do the forth by hand! You’ll notice that the front actually does intersect with both the cross bar and the center bar, the rear however doesn’t. Oh, well nothing is perfect. For reference the rear isn’t really that off center, the tubes just isn’t placed right yet, notice the center bar needs to move to the left a little to be centered. Just didn’t want you to think I do sloppy work!

Build-up 005


Yes it took me all day to do those 4 pieces, and if I ever have to cope them again I may have to hurt someone, but it’s done! :clappy: Only a few more sections left and we are done with the portions that are going to be made out of 2†Tube. I can’t wait since this seam like a major milestone to me. However this just means where about to get to those little detail orientated portions that always take up 90% of the time in projects like this.
 

Latest posts

Back
Top