-
Help Support Hardline Crawlers :
You are using an out of date browser. It may not display this or other websites correctly.
You should upgrade or use an alternative browser.
You should upgrade or use an alternative browser.
mopar buggy project
- Thread starter moparmagician
- Start date
moparmagician
Well-Known Member
Your pretty ballsy if you plan to mount link's to said "truss"
Ok, open for suggestions, that is the main reason I post here, to get others opinions and ideas, help is appreciated
moparmagician
Well-Known Member
I realized I did an opps. I made the truss to tall, I was not paying attention and forgot to take in concideration the diameter of the axle tubes into my equation. So I shortened it by about 2" and it looks a lot better. It is also now completely boxed in with 1/4" plate also, it's not going anywhere that if for sure. It's much stronger than the 4 links I have set up on drag cars in the past. And those are taking up to and over 1000hp in a couple of cases. It's all painted up so I will put it back together and position it under the buggy tomorrow. Time to get started on the link bars.
moparmagician
Well-Known Member
TreeClimber
Well-Known Member
Still too tall.
moparmagician
Well-Known Member
The link brackets are going to be mounted to the front face of the truss, in the calculations I've done, with the size of tires I plan to run, the seperation of the lower and upper links should be 9.75" apart. Several sources recommend 25% of total tire height. Does that sound better? I figured placing the brackets on the front face, and "C" notching them around the truss, would be a lot stronger than mounting them to the top and it pulling on welds on one surface only. By mounting them as I have planned, they will be welded on 3 sides, top, front and bottom of the truss. Make sense? If I'm still off base, please give me suggestions. I've got a lot of background, but the day a person thinks he knows it all, is when you really get into trouble.
redgearhead
Member
- Joined
- Apr 8, 2008
- Messages
- 7
- Reaction score
- 0
The only thing missing is that kitchen sink.:;
redgearhead
Member
- Joined
- Apr 8, 2008
- Messages
- 7
- Reaction score
- 0
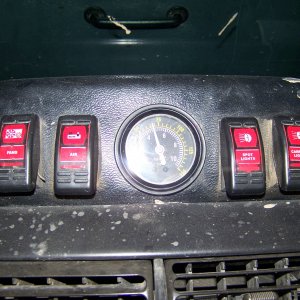
Pfft! This thing looks just like every ex-Super Gas drag car, Alston tube chassis, V-6 Mopar rock buggy out there on the trails.Finally the NP205 is together and installed. I made a mount with advise from Zukkev for the transfer case, with a single mounting point, not double. It probably didn't need one, but I didn't like the idea of all that weight hanging on the adapter. It's urethane bushed on the bottom with rubber on the top where it mounts to a cross member, so some cushion and flexing allowed. Hopefully I won't experience any broken adapters or transmission cases. I also installed a smitty built inclinometer on the dash. More of a trinket than anything. It was an item on our show trailer I run for the company I work for, and since smitty went belly up, I asked for it, and they gave it to me, so free is a good price. Now it's time for suspension and axles. I have to step up and get the ARB and spool, then 5.38's for both axles. It's only money right? The show season has started for me, in medford this weekend, so not too many more free weekends to work on it from here till the end of summer. So lots of after work hours. I must say, it's a blast though.
moparmagician
Well-Known Member
You know, my buddy Stan (noexcuses) and I were talking. He has a friend that just can't beleive how much buggy's are worth. I'm pretty lucky in the dollars I've spent so far, as I already had a lot of the stuff I've used, and I'm fabricating a lot of stuff to save money instead of buying it. Then you think about the time invested, that's almost scary. Granted I love it and am having a blast doing it. Also when it's done, I can say I built it, no matter how bad or good it looks, I've done it. I sat down and figured up, since october, I am probably over 800 hours on the project so far. Just think if you had to pay someone else to do it for you:looser: That makes a buggy worth a fortune in my book. A fortune to me anyways.
redgearhead
Member
- Joined
- Apr 8, 2008
- Messages
- 7
- Reaction score
- 0
That's why it's cool.:awesomework: Besides, you're using your brains instead of your checkbook to build this thing. You have three guesses to figure out who this is.You know, my buddy Stan (noexcuses) and I were talking. He has a friend that just can't beleive how much buggy's are worth. I'm pretty lucky in the dollars I've spent so far, as I already had a lot of the stuff I've used, and I'm fabricating a lot of stuff to save money instead of buying it. Then you think about the time invested, that's almost scary. Granted I love it and am having a blast doing it. Also when it's done, I can say I built it, no matter how bad or good it looks, I've done it. I sat down and figured up, since october, I am probably over 800 hours on the project so far. Just think if you had to pay someone else to do it for you:looser: That makes a buggy worth a fortune in my book. A fortune to me anyways.
moparmagician
Well-Known Member
That's why it's cool.:awesomework: Besides, you're using your brains instead of your checkbook to build this thing. You have three guesses to figure out who this is.
Oh, I know who this is, and thanks for the compliments
moparmagician
Well-Known Member
Well this weekend sucks, not working on the buggy, got a respiratory infection. So doing lots of research. I've been trying to figure out what to run for tires and wheels. The tires are still up in the air, although Iroks are looking good. I want a good all around tire. Now with wheels, I've decided to go with modified H1 wheels. I like the idea of double bead locks, especially after stan and I rolled a bead off in the rock crusher at browns camp. He has a single outer beadlock, and it's not fun trying to jack a rig up, on very unstable and uneven ground. We did get it back on with the wheel still on the rig, but it took a lot of pushing and words of choice to get it. One thing I will keep in my toolbox are a core tool, and a quick air attachment for the valve stem, most of our problem was we couldn't get enough air into the tire fast enough to pop the bead. Anyways, I really like what Wildman did with his jeep. :awesomework: http://www.nw-wheelers.com/forum/showthread.php?t=22442
So I'm going to do the same type of setup. I really think I am going to end up running 39.5x13.50x16.5 Iroks, which by the way suggest a 9.75" wheel. Some thoughts on the subject?
So I'm going to do the same type of setup. I really think I am going to end up running 39.5x13.50x16.5 Iroks, which by the way suggest a 9.75" wheel. Some thoughts on the subject?
moparmagician
Well-Known Member
I made out, we had our trade show for work this weekend, and one of the vendors gave me 4 rod ends for my 4 links. :awesomework: So now I only have 4 to buy, along with the rest of the needed pieces to complete the project. I'll be ordering all that tomorrow. Getting the tube adapters, flex joint mounting system, and lower axle joint brackets from Ballistic, the remaining rod ends and jam nuts from Currie. They are the cheapest for each I could find, and I don't think you can beat Ballistic's brackets for the price. Now I just need to order some spare time up to get back to work on it.
moparmagician
Well-Known Member
a typical sunday, went to get some things welded up and you know it, ran out of argon. Why always on a sunday. Anyways bought some stuff, brackets, tube adapters, from ballistic, the rest of my johnny joints, and jam nuts from currie. Now I just have to wait for the the tubing for the link bars to show up I ordered from the local outlet. 2.25x.375 wall, and 1.75x.250 wall. Steel is expensive, $180.00 for 12 feet of the larger and 10 feet of the smaller, it's not only gas that has gone up. Warrented a battery today, and in 3 years, the cost has doubled. Anyways, the front is ready for the link bars, just have to make the bars when the material gets here. Got the brackets I ordered for the rear. I could make them, but ballistic does such a nice job and for cheap. So anyways, back to work.
Attachments
Last edited:
moparmagician
Well-Known Member
Got the brackets all welded on the rear axle, now it's time for the rear frame mounts. I think it's lookin good. I am going to make the upper frame mounts adjustable and the lowers will be tucked inside the frame rails like the front. Nothing hanging out that way to get caught up on rocks. Link bar material is suppose to be here the first of next week. Getting closer...........
Attachments
NateH
Well-Known Member
Looking good.
moparmagician
Well-Known Member
no excuses
Well-Known Member
hey Marty the bike looks great, hmmm makes me think that I NEED one :haha:
moparmagician
Well-Known Member
I think you "NEED" one to, seriously, you do NEED one! Trust me on this one.
redgearhead
Member
- Joined
- Apr 8, 2008
- Messages
- 7
- Reaction score
- 0
Hey Marty, why don't you tell the folks about your recent adventures?


