• Help Support Hardline Crawlers :

Wife's MJ

Educate me about Texas Plates. I see the before shot, old front bumper, and then the after shot, new rear bumper. The plate alpha numeric is different.

No, I don't figure you did all this work over the weekend.
 
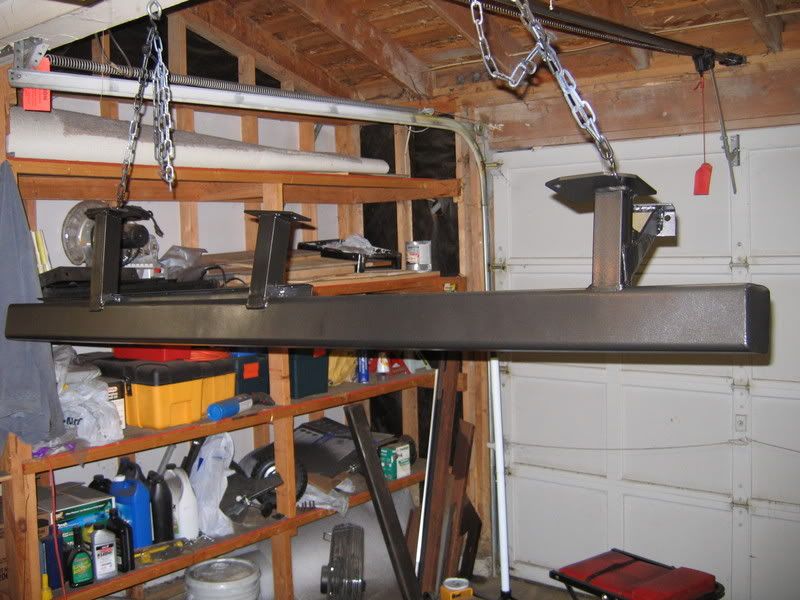
This is the passenger rock slider I built. Still need to build one for the driver's side.
IMG_8034.jpg


Willy
 
Educate me about Texas Plates. I see the before shot, old front bumper, and then the after shot, new rear bumper. The plate alpha numeric is different.

No, I don't figure you did all this work over the weekend.

The before picture is with the previous owner's tags. In TX you can retain the tags and just transfer everything to the new owner. But, the previous owner never switched the tags over to her name, but she did sign the title. This resulted in her having to return the tags to TX and transfer the title to her name. Then we could tag it in our name which resulted in completely new tags. It was a huge PITA.

Willy
 
Last edited:
That pretty much brings everything up to date. I've got a few more plans for it in the immediate future.

- Build the driver's side rock slider
- In cab winch controls
- Make new battery cables out of 2/0 wire
- Transmission cooler
- I've got a radiator on the way to convert the leaking closed system to open
- Second electric fan in place of the manual fan
- SPAL electric fan controller
- Build tail light boxes, similar to some of the XJ boxes I've seen

I'd like to bob the bed eventually. But that will wait until I feel inspired to tackle that much body work. I'm sure I'll think of some other updates along the way too. :D

Willy
 
Made the battery cables last night and used these fancy battery terminals. :bling:
IMG_0168.jpg


IMG_0169.jpg


UPS just made a delivery. Hope to get it installed this weekend and maybe the transmission cooler too.
IMG_0170.jpg


Willy
 
I'd also like to add a transmission temperature gauge. Any recommendations? I plan to add sensors before and after the cooler with a switch to swap back and forth.

Thanks,
Willy
 
I'd also like to add a transmission temperature gauge. Any recommendations? I plan to add sensors before and after the cooler with a switch to swap back and forth.

Thanks,
Willy

thats what I need to do still...I'm interested to see if anyone has any input...you running the 91 newer aw4? or the early auto?
 
Thats what would have been nice for me to put in(I got a 91 aw4 from a buddy for an old shotgun)...because I've got my jeep all wired up to manually switch the selenoids to change gears...also a tq lockup so I have engine braking(just need to make sure I turn it off before I stop).
 
The new stuff I'm currently working on.

Shiny radiator. :smile:
IMG_0176.jpg


Transmission cooler.
IMG_0171.jpg


SPAL controller with extra harness for second fan.
IMG_0172.jpg


Radiator and cooler installed. I have a heater control valve on the way. I still need to replace the thermostat since I have the coolant drained. I also picked up a generic overflow reservoir that I need to install.
IMG_0177.jpg


IMG_0178.jpg


After those last couple of things I'll see what I can do with the SPAL controller. Can't say I'm looking forward to that, but the instructions seem pretty detailed with lots of pretty pictures and diagrams. Hopefully I'm smart enough to figure it out. :redneck:

Willy
 
After a couple of weeks of working on my Jeep I got back to the MJ this week. The heater control valve, thermostat, and overflow bottle are installed. I still need to hook up the SPAL controller.

After tripping over the passenger side rock slider for several months, I finally installed it.
IMG_0297.jpg


IMG_0298.jpg


IMG_0300.jpg


I tucked it up as close to the body as I could without doing a rocker replacement.
IMG_0299.jpg


I tied the front support into the TNT belly pan.
IMG_0303.jpg


It's also attached to the pinch seam with angle iron.
IMG_0305.jpg


This is the middle support. It is attached using crush sleeves similar to the TNT belly pan mounts.
IMG_0307.jpg


This is the rear mount. I wanted to give it some vertical support. The front and middle mounts use the pinch seam for vertical support. I added this foot to the top of the uniframe to help support the rear mount.
IMG_0308.jpg


I still need to build the rock slider for the driver side.

Willy
 
Pulled it out of the garage and took it for a drive. A few pics of it outside.
IMG_0328.jpg


IMG_0329.jpg


IMG_0327.jpg


IMG_0326.jpg


After running the wiring for the SPAL, I had the joy of ripping half of it out and doing it again. I wanted to be able to control the fans three different ways:

- Both off
- Both managed by the SPAL controller
- Both on

My first attempt included running completely separate wiring through relays to both of the fans to control whether both fans were on with an in cab switch. I didn't realize at the time that the SPAL controller uses the ground to control the main fan. Since I added a ground for the main fan in my bypass wiring, the main fan would run constantly whether the SPAL was on or not.

In the end I completely removed the relays and my original bypass wiring. What I now have are two in cab switches. Switch number 1 controls the SPAL. With this switch off, neither of the fans will run. When on, the fans are controlled through the SPAL. Switch number 2 controls if the fans are on manually, bypassing the SPAL through the AC wire of the SPAL controller.

Now I have the three features I want:

- Switch 1 off, switch 2 off: both fans are off
- Switch 1 on, switch 2 off: both fans are controlled through the SPAL
- Switch 1 on, switch 2 on: both fans are on

Also spooled the winch cable. Even though I kept the cable wrapped up nicely, it still ended up in a wonderful bird's nest when I went to spool it around the winch. :masturbanana[1]:

Added in cab winch controls. Thankfully I got that wiring right the first time. :awesomework:

Willy
 

Latest posts

Back
Top